1.e4 c6 2.d4 d5 3.e5 c5
This move is played frequently at high levels. It probably doesn’t “feel right,” because Black moves the same pawn twice in the first three moves, and offers to sacrifice that pawn the second time it moves forward.
However …
This move reveals the unexpected beauty and infinite variety of chess. The elements (time, space, and force) are always intermingled, and we often trade one for the other at many points in the game.
By playing 3…c5, Black trades time for activity, and the opportunity to pressure White’s e pawn, by removing its foundational support on d4.
White captures this pawn in the vast majority of games, and Black gets active play in all the main lines.
However, I came across some very interesting chess analysis recently, and the writer recommended the response 4.c4. I played this move and won very quickly against an Expert about a month ago.
I like this move for three reasons:
- Since it’s only played rarely, there’s a good chance that Black will “be on his own” without any previous analysis to help him find the right moves.
- It denies Black the kind of game he wants (active play in return for a pawn). Instead, White increases the tension in the center, and relies upon his advantage of the first move to leverage every each possibility.
- Finally, the main line leads to the most aesthetically pleasing and surprising variation in an opening system that I’ve seen in my entire 30 years of tournament chess (and I’ve explored thousands of variations).
4.c4 Nc6 5.Nf3 Bg4
Note how both sides play dynamically to control central squares.
6.cxd5 Qxd5
The main line.
7.Nc3 Bxf3 8.Nxd5
It’s useful to briefly reflect upon this position.
The forces have engaged in a direct confrontation from the very beginning. This was dictated by the extreme central tension that resulted on the board after White played 4.c4. This means the play has been very much in the spirit of the first several moves.
Central Pawn Structure Determines Best Piece Play
The way each side handles the center (in this case 3...c5 and 4.c4) will determine the nature of the play that follows. Always seek to understand what’s happening in the center, and how that effects the placement of the pieces and sequence of moves that follow.
There are many openings at high levels that feature sharp tactical exchanges early in the game. We aren’t necessarily recommending this style of play, as it requires more calculation than usual, and the play is less intuitive.
However, it’s good to know such chess openings exist, so you can be ready to dive in if the current of the game leads you into these deep waters. Here’s a general guideline:
In tactical positions (when the forces are in direct conflict) it pays to look for the most dynamic move first. If it looks good, that’s the move you’ll frequently want to play.
8...Bxd1 9.Nc7+ Kd8 10.Nxa8 Bh5
Question
Why is 10…Bg4 a better move?
Answer
In this game there’s a very specific reason, and we’ll get to that soon. But in general, a well centralized piece always controls more squares, and it’s always good to control squares. The bishop is more centralized on g4, and controls more squares from that location.
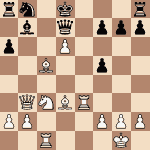
11.d5!!
I would never have predicted this beautiful move, or the idea which waits to be revealed.
11...Nb4
11...Nxe5? is an error. White plays Bf4, and then extracts his knight from the corner (unless Black plays ...f6, and this is very ugly, as it results in double isolated pawns in the center of the board).
Control Key Squares to Help Your Pieces
When you have a knight stranded in the corner after capturing a rook, look for a way to control a square it can use to jump back into the game (in this case c7).
12.Be3!
The second beautiful move.
White is willing to sacrifice his rook. He’s playing for mate, and his attack is very dangerous.
Question
It’s not often White can play such beautiful moves so early in the game. How did 11.d5 and 12.Be3 become possible?
Answer
Black’s kingside development is way behind. It’s true that White is sacrificing material. However, in terms of what’s happening on the board right here and now, Black’s material advantage is completely buried and undeveloped.
That means this is a classic gambit (trade of time for force).
12...Nc2+ 13.Kd2 Nxa1
White’s winning easily after 13...Nxe3 14.Kxe3
14.Bxc5
Now we start to see the point of White’s combination. Let’s review what’s happening:
White’s knight threatens to escape.
Black’s knight is trapped in the corner.
White has tremendous square control in the center and on the queenside.
Black’s kingside is completely undeveloped.
14...b6
A natural move designed to prevent Bxa7 and the escape of the knight.
15.Nxb6
The next unhappy surprise.
15...axb6 16.Bxb6+ Kc8 17.Ba6+
Bishops and Pawns Side by Side Control Adjacent Squares
Bishops or pawns side by side can be absolutely devastating. In this case, the pawns prevent Black from completing his development, and the bishops control all the escape squares of Black’s king.
17...Kb8
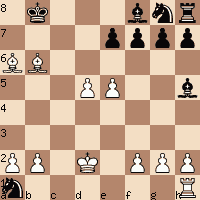
18.Rc1 Bg4
This bishop move is the only way to stop checkmate on c8. Now we know the specific reason that 10...Bg4 was a better move. Of course we could have never predicted this position, and the fact it meant that g4 was the best square in the first place.
However …
Chess Players are continuously punished in surprising and unexpected ways for not placing their pieces and pawns to control central squares. So always keep the center in mind, even when you’re calculating an operation on the flank. Play usually returns to the center at least once before the contest is complete.
19.e6 Resigns.