One of the first chapters in almost every chess book written for new players is called something like “The Elements.” It goes on to define them as time, space, and force.
Your strength will increase greatly as you develop the ability to see the implications of your moves in these terms. It’s a powerful way to break down a chess position, in order to understand what’s happening on the board.
Each chess game represents a series of transformations, as the time, space, and force present themselves in different configurations as the game evolves.
Every position is unique, and the relative importance of each element varies depending upon the exact position on the board.
In this contest, we will focus upon the value of time, as my opponent made an error in the opening that allowed me to gain valuable time, and quickly develop a strong attack against his King.
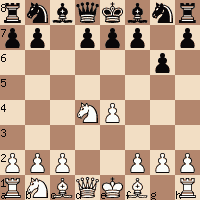
1.e4 c5 2.Nf3 g6 3.d4 cxd4 4.Nxd4 Nc6 5.Be3 Nf6 6.Nc3 Bg7 7.Be2 0–0 8.Qd2 d6 9.Nb3
We’re looking at The Dragon Variation of the Sicilian Defense. It’s one of the sharpest openings in all of chess.
The expression “sharp” is frequently used to describe certain chess positions. It means that a single inaccuracy can quickly determine the outcome of the game.
There are more decisive outcomes and fewer draws with sharp openings. They also require a higher level of precision.
Here are some of the key factors that make an opening “sharp.” You can think of them as you assemble your opening repertoire and develop your chess style.
Factors that define a sharp position
- Castling on opposite sides of the board.
- Imbalances in the pawn structure.
- Element trades
Opposite side castling
Castling on opposite sides of the board often results in extremely sharp play, as both sides attack the opposing king. King safety often becomes the primary concern.
In the current position, White is poised to castle queenside, and Black’s king has already committed to the other wing.
Imbalanced pawn structure
Imbalances in the pawn structure create opportunity for both sides. The Sicilian is the sharpest opening in chess, and it’s favored by players with an uncompromising style who play to win. The middlegame positions often become sharp as a result of the pawn structure after 3…cxd4.
As a result of the exchange cxd4, Black controls squares on the c file, and often posts his pieces on c5 and c4. He also has more central pawns, and that’s a big reason Sicilian endings are often good for Black.
White controls squares on the d file, posts pieces on the d4 and d5 squares, and posts a knight on d5 in a large number of situations (as happened in this contest).
He also has better development, and a space advantage, that results from his e4 pawn. In this opening, White usually looks for a way to convert his time and space advantage into an attack against the king.
Element Trades
“Element Trades” round out our discussion of factors that make a position sharp. I made up this phrase to describe the fact that many positions involve trading one element (time, space, and force) for another.
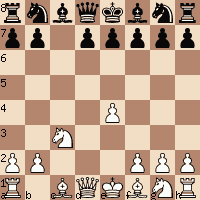
In many openings element trades set the tone for the entire contest. Here’s a position from the Nimzoindian Defense after 1.d4 Nf6 2.c4 e6 3.Nc3 Bb4 4.a3 Bxc3+ 5.bxc3
Black played …Bxc3 in order to double White’s c pawns. In its essence this move represents a trade of force for space. That’s because the latent potential (force) of the bishop pair is considered a long term advantage.
On the other hand, Black inflicts damage on White’s pawn structure (space), and often develops play against those weak pawns, and nearby squares.
The elements can be traded in many different ways.
Here’s an example from the Smith Morra Gambit. It’s a good example of trading force (sacrificing material) for time (rapid development).
After the moves 1.e4 c5 2.d4 cd 3.c3 we have the following:
Back to the game …
9…Ng4
In my database, I have 24 games with the position after 9.Nb3.
The moves 9…Be6 and 9…a5 are the only continuations. Both these continuations are thematic, because they enhance Black’s counterplay, which is vital, because of the sharp character of the opening, and the relative position of the kings.
The move …a5 is frequently a good move to play against a knight posted on a3, and 9…Be6 fights for the c4 square.
On the other hand, 9…Ng4 has the opposite effect. White is able to capture on g4, then play f3.
The move f3 is played in over 90 percent of Sicilian Dragons, because it supports the g4 square. After playing g4, White then proceeds with h4, and opens up lines to Black’s king.
The importance of counterplay in sharp positions
All these moves are standard, and Black can often handle these threats as long as he develops counterplay against White’s king. However, in this particular contest, Black never develops any threats at all.
In the Sicilian Dragon it’s vital for Black to develop counterplay against White’s king. The element of time is highly emphasized in this sharp opening, as it is in all sharp openings. In many of the main lines, the outcome is often decided by “who gets there first.”
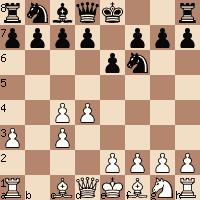
10.Bxg4 Bxg4 11.f3 Be6 12.Bh6
Eliminate your opponent’s best minor piece
Black’s dark squared bishop is his best minor piece in the Dragon. That’s because it helps protect the king, and also plays a powerful attacking role in many variations.
The move Bh6 is played in many of the main lines in order to eliminate “the Dragon bishop.” In addition to eliminating Black’s dark square bishop, it also prevents Black from blocking the h file after h4-h5, which is a standard defensive idea in many of the main lines.
Black doesn’t get a chance to play any of his best Dragon ideas in this game, because of the time he lost after 9…Ng4.
12…a6 13.h4 13...f5
Black wants to bring his queen over to defend the king. However, this move weakens his light squares, and White finds a powerful tactic, based on this fatal weakening.
14.h5 Qe8 15.Bxg7 Kxg7 16.Nd5
The move …Nd5 plays a huge role in many Sicilians. The knight is often sacrificed on that square when Black’s king is in the center, and the balance of theory in those variations often revolves around that sacrifice.
Every opening has recurring themes that show up many different ways depending upon the exact direction the contest takes.
As you get to know your openings, you will become increasingly aware of those themes, and develop a good sense of when they apply.
16...Rc8
If 16...Bxd5
Black’s knight will lose control of d4.
This enables White’s knight to occupy that square.
White’s e4 pawn ends up on d5.
That means White gains complete control of e6.
White’s knight will occupy e6 and dominate the position.
17.hxg6 Qxg6 18.Nf4
White is already winning after this move. Black has too many weak squares around his king, and has not developed any counterplay.
18...Qg3+
The “natural move” isn’t always best.
This was a speed game on the internet, and nine out of ten players would have instinctively played this queen check.
The best move was 18…Qf7, but it was also losing.
19.Kd1 Bf7
Played to prevent 20.Nh5+ forking the king and queen.
20.Rh3 Qg5 21.Ne6+ Bxe6 22.Qxg5+ resigns.
Summary
Black’s game quickly became difficult after the sequence 9…Ng4 10.Bxg4 Bxg4 11.f3 Be6.
He lost time when he had to retreat his bishop on move 11, and White gained time when he “played f3 for free” attacking the bishop.
White was able to quickly advance his attack on the kingside, and Black’s counterplay never developed. Because we were in a sharp opening, the extra time made a great difference in the direction of the game. Black was forced into a completely defensive situation, and the game “almost played itself” from the White side of the board.
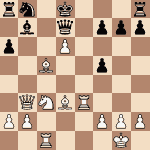
I encountered a variation of the Nimzoindian Defense when playing chess. The FEN was 1nbq1rk1/2p2ppp/rp1ppn2/p7/2PP4/2P2NP1/P2BPPBP/R2Q1RK1 w – – 0 1. The doubled pawn is a result of taking a black bishop with the now-backwards pawn instead of with the bishop. However, if I had taken the bishop with my bishop, I would have ended up with a bishop that could only move to its original square and a pawn that can only move one square forward. Worse than having a protected backwards pawn and a doubly protected bishop.