The following article is an excerpt from Pete Tamburro’s book Openings for Amateurs: Theory vs. Practice (Mongoose Press, 2024), referenced in our previous column State Pride in Chess and Pawn Chains. Published with permission from Pete and Mongoose Press, it also includes the original pages from the book as PDF at the end.
Andy Ansel, chess book collector extraordinaire and superb chess researcher, also collects notebooks left by masters. His column in American Chess Magazine is called, “Unknown American Chess Games.” He writes an appreciation and history of a noted American master, and I annotate most of the games he finds. This game by IM Bill Martz was a brilliant selection. I was in awe of Martz’s plan as I played it through, again and again. You see, positional chess requires you to have a somewhat long-term plan that involves understanding what pawn structure you want, figuring out the potential weaknesses are in your opponent’s position, and what the right destination squares for your pieces are. Then you have to come up with a concrete implementation of the plan, with a sequence of moves that helps you achieve your goals. All of that is in this game!
1.c4 g6 2.e4 Bg7
In the June 1972 issue of British Chess Magazine, William Hartston wrote an article, “The Anti-anti-Grünfeld.” He spent more than three pages on it, but apparently Mr. Chess [yes, that’s his name – ed.] didn’t read the literature, or perhaps was suspicious of it: 2…e5.
3.d4 d6 4.Nc3 Nd7
Does anyone still play this junk? Oh, yeah! Over 4,000 games with this for Black and some famous GMs to boot. It creates complications and often puts opponents on their own without their precious little book lines. However, Martz has a system against this sort of thing.
5.Be3 e5
There is 5…Ngf6, but that isn’t why Black started out the way he did.
6.d5 Ne7
Considering the similarity to the King’s Indian, one would think that Black – especially given the e3-bishop – would want to discourage b2-b4. However, 6…Ne7 shows that his idea in avoiding …Ng8-f6 was to play …Ng8-e7 and …f7-f5 without having to retreat the knight from f6 to advance the pawn.
6…a5.
7.Qd2 0-0 8.0-0-0 f5 9.f3 Nf6 10.h3 f4 11.Bf2 a6
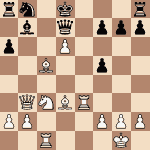
Black obviously has the position he wants. The move sequence certainly constitutes a unified approach. The question is: Does anyone else want this? Black had a set series of moves in mind, no doubt aiming at a kingside attack, but his opponent didn’t cooperate. If you were White here, what would your plan be?
Martz now plays a series of opening moves that encompass an overall strategic plan. All your openings should have that. Thinking of the “ten-move rule” I constantly harp about, if you are here at move 11 and have no idea what to do, then you need to re-evaluate how you study your chess openings. Watch the master!
12.Kb1! Bd7 13.Rc1!
While Black may have forestalled a kingside attack by White, Martz plays two fine positional moves to lift the curtain on his plan: He’s coming down the c-file! With respect to the prior question, did you pick this as your plan?
13…Qb8 14.c5 Kh8 15.Bd3
Time to get the rest of the team on the field. Black has no counterplay.
15…b6 16.cxd6 cxd6 17.Nge2 b5
Second Plan Question: What next? (Hint: There are two weak squares of special interest in Black’s camp: c6 and a5. What relationship do they have to each other?)
18.Ka1 Nc8 19.Nb1 Rf7 20.Qa5 Ne8 21.Rc2 Qb7 22.Nc1
White has a stranglehold on the dark squares as the Indian bishop is useless, but what were those two Nimzowitschian knight retreats about?
22…Rb8 23.Nb3 Bf6
After all that time to save a tempo for the knight move and …f7-f5, Black has to give it back with interest just to get the bishop back in the game.
24.Rhc1
Yes, the rooks dominate the c-file, but they have no entry square on c7 or c8, so other than looking powerful, what is their purpose? Stay tuned.
24…Nb6 25.Qe1 Bd8 26.Na5
Ah! Now it is all revealed: a5 is a knight move from c6 and Na5-c6 is now supported by two rooks and a pawn. Very impressive planning on Martz’s part.
26…Qa8 27.Nc6 Rb7
The knight looks like it’s a sheepdog holding a small group of 6 or 7 sheep at bay, but he trades it off!
28.Nxd8 Qxd8 29.Qa5 Rb8 30.Nd2 Kg7 31.Nb3 Na4 32.Qxd8 Rxd8 33.Na5
Absolutely brilliant positional chess! He does the same maneuver again: Q to a5, N to b3, Q moves, then Na5 and Nc6. Is that cool or what!? Go back and look at the position after the knights went back to c1 and b1. Did you see that plan?
33…Rb8 34.Nc6
An encore bow at c6. Bravo!! Black could have resigned here in good conscience.
34…Rc8 35.Nb4 Rxc2 36.Rxc2 a5 37.Nc6 Bxc6 38.Rxc6 Rc7 39.Bxb5 Nc5 40.Bxc5 dxc5 41.Re6 Nf6 42.d6
(Source: unpublished Martz notebook.)
There you have it – it’s a textbook lesson on exploiting square weaknesses. Go back and play over the game several times. Go to the first diagram, where you are asked what your plan would be. Now, having played over the game, you should know the plan; however, I’m asking you to play it out in your head, just as you would if you were over the board. Then you’ll be on your way to becoming a positional player!