In the eighth round of the 2018 U.S. Chess Championship, the game between grandmasters Ray Robson and Varuzhan Akobian reached king, bishop, and knight versus king. Knowing how to checkmate with a bishop and knight is one of the basic endgame checkmates. In this article, the Robson vs. Akobian game (specifically the king, bishop, and knight versus king checkmate part) is annotated by National Master Elliott Neff, founder of Chess4Life and author of the forthcoming book A Pawn’s Journey: Transforming Lives One Move at a Time.
Before I present Elliott Neff’s annotations, I (Alexey Root) share my advice and experiences with basic endgame checkmates. When facing a lone king, you should know how to checkmate if you have king and queen, or a king and two rooks, or a king and one rook, or a king and two bishops, or a king, knight, and bishop. When I was a child, I was successful with the easier endgame checkmates. For example, on my first visit at age 9 to the Lincoln (Nebraska) Chess Club, I completed a king and two rooks versus king checkmate. A few years later, I failed to checkmate with king, bishop, and knight in a Portland, Oregon, tournament game. For that tournament, I was rated around 1800 in the US Chess rating system, in the top ten percent of all rated players in the U.S. Yet I had never studied the king, bishop, and knight versus king checkmate. I did not find the solution over the board and drew the game.
Back in the 1970s and 1980s, I could have studied that endgame checkmate in books. Now there are also Web sites and videos teaching that checkmate. Most videos only show the checkmate when the king is already on the edge of the board. But it is important to learn what to do when the defending king starts in the center, as in this video. In it, National Master Elliott Neff shows how to drive the defender’s king from the center to the edge of the board and then follow it up with checkmate. So watch his video!
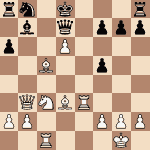
Now you are ready to play like a grandmaster, specifically Grandmaster Ray Robson. After Robson played 117. Bxd8, capturing Akobian’s rook (which had just sacrificed itself on d8 for White’s promoted queen), Robson is left with king, bishop, and knight versus Akobian’s lone king. In the diagram below, it is White to move:
Play out the position that Robson had, making the best moves for White. You can also play the moves for Black (Akobian) or recruit a friend or family member to play Black against you. Did you checkmate? How many moves did you take? Robson took 27 moves.
Here is the rest of the game annotated by Elliott Neff, with lots of advice from him too! Elliott Neff wrote the rest of this column; thanks, Elliott.

Elliott writes: If this is the first time you’ve seen an endgame with just the bishop and knight, it’s important to understand just a few key principles in order to confidently WIN if ahead, or confidently DEFEND if behind. Agreed, if you are behind, defending may simply feel like you are prolonging the inevitable; however, you never know – posing problem after problem, it can take just one key mistake by your opponent, and your hard work may pay off to result in a draw. Perhaps your opponent doesn’t know the key principles for winning this endgame, or perhaps your opponent is simply too tired after a long battle to find the way to win. Just remember, NEVER GIVE UP! Worst case scenario, you can simply learn from the experience and be proud of the fact that you gave it your all. So what are those key principles? Here you go:
MOST IMPORTANT: in order to force checkmate, the king must be forced into a corner of the board that is the SAME color as the color of squares the Bishop is controlling. In the game we are looking at, that would be either a1 or h8 because of the white bishop controlling the dark squares.
There are just THREE KEY PRINCIPLES you need to follow in order to force the win.
- First place your pieces near the center of the board.
- Force the king onto an edge.
- Force the king into the ‘right color’ corner and deliver the checkmate.
If you are defending the position, simply oppose these three principles.
- Stay near the middle.
- Seek to avoid the edges, and especially the corners of the same color as the bishop.
- When being forced towards the dangerous corners, look for any opportunity to run away and escape the ‘mating net’
Never Give Up – posing problem after problem, it can take just one key mistake by your opponent, and your hard work may pay off to result in a draw
So, with this background, let’s examine the moves played to finish this game.
117…Kd6 Moving the King into the middle of the board with 117…Ke5 is what I would recommend as slightly more accurate because it is in the very center of the board. I believe this would prolong the game slightly more than was played. However, it’s possible that Akobian was intending to simply run to the ‘wrong colored’ corner to force his opponent to prove he knows how to drive the king all the way to another corner.
118. Kd4 Excellent move controlling the center with the king.
118…Kc6 Good choice – if 118…Ke6, then 119. Bc7! Would already trap the king away from the ‘wrong corner’ and towards the checkmating corner.
119. Nc4 Well played, coordinating the pieces near the middle and taking away key squares from the opponent.
119…Kd7 120. Bg5 Kc6 121. Bf4! Finishing the coordinating of the pieces near the center.
121….Kb7 I would suggest …Kb5 as slightly better since it delays the ending a little, forcing White to play accurately and still retaining the option of getting to a8 via a6.
122. Kd5 Here is a KEY TIP for playing this endgame accurately. Every move simply ask yourself, “Where will my opponent move next?” Remember the defensive principles? Stay in the middle, stay off the edge, stay away from the checkmating corners… So in this position before moving, the defending king would love to move back to c6 – hence this move Kd5 ‘takes away’ that primary square.
122…Ka7 Can you see what is the ‘ideal’ square the defending king would like to move to? That’s right! Back to b7. How do you take that square away? Very good!
123. Kc6! Ka8.
At this point you could say that objectives 1 & 2 have been accomplished – the king is forced out of the middle and onto an edge, in this case the ‘wrong corner’ – so now it’s time for step 3, forcing the king to the ‘checkmating corner.’ How do we do this? There are three more tips that I generally recommend:
- Note that the bishop controls only one color of square – in this case the dark squares
- The knight must therefore control the other color of square – in this case the light squares
- The king will typically stay on the 3rd row all the way to the checkmate (3rd rank, 6th rank, c-file, or f-file) – in this game, the 6th rank.
Let’s see now how this plays out.
124. Be3 Forcing the king to b8 and signaling the intention to force the king over to h8. NOTE that the bishop could have been left on f4, instead playing 124. Nb6+ in order to force the king to a7, then play a tempo move such as Be5 forcing the king to a6, then play Bb8 ‘taking away’ a7, thus forcing the king further towards a1.
124…Kb8 125. Nd6 The knight maneuvers into position, aiming to land on c7 to take away the a8 square from the king. Note how Nb6 would block the bishop allowing the King to move back to a7. This is a little awkward here and takes a couple extra moves – hence the suggestion on move 124 to play Nb6 instead may have ended the game sooner.
125…Ka8 Only move.
126. Nb5 Kb8 127. Nc7 Taking away a8. Another TIP: Once you place a piece to take away one square (here a8) do NOT lose control of that square UNTIL you take away the next square over (in this case b8) – watch how this unfolds, square by square across the 8th rank.
127…Kc8 128. Ba7 Covering b8, hence freeing the knight to maneuver to control c8 next.
128…Kd8 129. Nd5 Note the knight is headed for e7 to control c8, and along the way blocks the king from escaping the edge via e7.
129…Ke8 This is the king making a run for it! Not heading for h8 but striving to escape all the way to h1, the “wrong-color” corner. It’s a race!
130. Kd6 Protecting e7 so the knight can go there.
130…Kf7 131. Ne7! Continuing the plan, controlling c8, freeing the bishop to move away from a7 where it was controlling b8.
131…Kf6 NOTE here that it could look as if the king has escaped and is on its way to h1. However, if you look closely at the “escape squares” there is really just one, and that one can be covered.
132. Be3! Kf7 133. Bg5 This works just fine and efficiently; however, I recommend in my video to play Bd4 in order to be able to play Bb6 when needed to cover the escape square d8. For example, 134. Bd4 Ke8 135. Ke6 Kd8 136. Bb6+! When we simply repeat the same pattern as before to move the king the rest of the way to h8. NOTE that the reason I recommend this method is for simplicity – why not simply repeat one pattern in order to make it simpler to remember. ? Back to the game…
133…Ke8 134. Nc6 Not to cover d8 as the bishop covers that square, but to re-route to e5 to cover the possible escape square g6.
134…Kf7 135. Ne5+ Ke8 136. Ke6 Kf8 137. Kd7 In this game the white king leaves the 6th rank – all because of the choice to play 133. Bg5 instead of repeating the same pattern as before.
137…Kg7 138. Ke7 Closing the distance to the corner.
138…Kg8 139. Bh6 Kh7 140. Bf8 Kg8 141. Ng4 Kh7 142. Kf7 Kh8 143. Bg7+ Kh7 144. Nf6#
If you follow the “repeating pattern” recommended in my video, the knight will form a large W on the board. Nc7 (covers a8), Nd5 then Ne7 (covering c8), Nf5 then Ng7 (covering e8) and only here for the final checkmate move back to f5 then to g6. To see this in action, check out the video. Finally, congrats to the grandmasters: Ray Robson for knowing or figuring out the tricky checkmate with the bishop and knight and to Varuzhan Akobian for not giving up, putting his king in the “wrong” corner, and fighting it out all the way to the end.
Thanks for sharing these useful information! This is really interesting information for me.
I believe this is the best “Bishop and Knight Mate” video clip.
Well done Sir & i hope you are going to post more videos for beginners & every one.