Description
White takes time to exploit a dark square weakness early in the game. Black responds by sacrificing the exchange for quick development and dynamic play. This chess strategy initially plays well, but fails to target the right weakness at a key moment. This allows White to consolidate, simplify the position, and the exchange suddenly becomes decisive.
Key Points
- Attraction to Ideas.
- Alternative Goals.
- Clash of Elements: Force vs Time, Space, and Activity.
- Key Choice: Continue to Develop or Exploit a Weakness.
- The Unclear Sacrifice: a Big Commitment.
- The Downside of an Intuitive Sacrifice.
- The Power of an Exchange.
- The Right Attitude towards Complications.
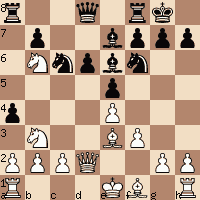
1.e4 c5 2.Nf3 d6 3.d4 cxd4 4.Nxd4 Nf6 5.Nc3 Nc6 6.f3 e5 7.Nb3 Be7 8.Be3 0–0 9.Qd2 a5 10.Na4
Attraction to Ideas
The standard reply to this move is 10.Bb5, which controls a4, and continues development. I was aware of this during the game, but found myself very attracted to 10.Na4. This is a move I never looked at in the past, and I found myself wondering if it could be as good as 10.Bb5.
Alternative Goals
There can be several different goals worth pursuing at any point during the contest. It’s usually easy to see what you want to do… the hard part is deciding what’s most important at a given moment in time. Sometimes there’s a clear choice, and sometimes it’s a matter of style and preference.
Continue to Develop…
That’s the fundamental choice between 10.Bb5 and 10.Na4. If you’re unsure what’s most important, development will always be the safest choice, and all things created equal, that’s what I recommend.
On the other hand…
If the attraction to an idea is strong, I recommend you go with your instinct. You’ll increasingly experience this “power of attraction” as you continue to improve.
I came very close to playing 10.Bb5, on the basis of “safety first.” However, my mind kept returning to 10.Na4, and after about ten minutes of reflection, it was time to move forward one way or the other, so I took the leap of faith.
10...Be6
When I got home, I look at my database, which consists of games where both players are rated over 2300. It turns out that 10.Na4 scored a little better than 50%, but was only played 13 times out of a total of 348 games.
However…
There is a happy upside of playing a rare but solid move… there’s a good chance your opponent has never seen it before.
That was the case with 10.Na4, since Baker spent over 20 minutes on his reply.
Or Exploit a Weakness?
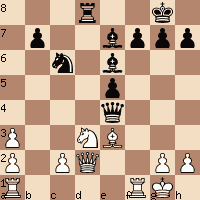
Nb6 a4
This was how my opponent was spending his time !!!
It turns out this exchange sacrifice is very strong, as testified by the fact that three players in the database, with an average rating of 2541, also played 11…a4, and won two out of 3 games.
Baker is a strong master who has maintained an average rating well over 2300 for the last decade.
The sacrifice never came to my mind when I played 10.Na4. However, once I took the plunge, it only made sense to play consistently, and occupy the b6 square.
We’ll discuss the nature of this sacrifice in a few moves, when an instructive position appears on the board.
As a point of interest, it’s worth noting that this game was played in our Club Championship Tournament, which is still in progress. I’ve occupied b6 with a knight against the Sicilian defense in two games against two masters, and won both games.
12.Nxa8 Qxa8 13.Nc1 a3 14.bxa3 d5 15.Bd3
The move 15…d4 might appear attractive; however, Black’s goal is to open the position before I complete my development.
dxe4 16.Bxe4 Rd8 17.Nd3 Nxe4 18.fxe4 f5
An Unclear Sacrifice is a Big Commitment
My opponent was clearly uncertain about the correctness of his sacrifice, and that’s why he thought long and hard before making the commitment.
Many of the most beautiful games in the history of chess have followed after what we’ll call an “intuitive sacrifice.”
There are many different types of sacrifices, and “intuitive” is a good way to define the sequence that ended with 12.Nxa8 Qxa8 13. Nc1 a3 14.Bxa3 d5 15.Bd3
It means that Baker was unable to calculate all the way through to a clear conclusion, but he instinctively felt his sacrifice was correct.
Black’s Compensation
- Extra pawn.
- Active play for queen and rook.
- White’s queenside pawn structure has been destroyed.
- Black has the bishop pair.
- White’s king pawn is weak.
That’s a great deal of compensation, and I would rather be on the Black side of this position, especially since I don’t like to defend.
The Downside of an Intuitive Sacrifice
The player who makes the sacrifice is often compelled to follow up with great precision. Sometimes, even if he plays just one 2nd best move, the defender has time to consolidate.
That means the attacker has accepted a large responsibility to play at a high level after the sacrifice. A big part of this involves assessing the imbalances accurately, and exploiting the opponent’s weaknesses with laser precision.
It turns out that Baker had everything he needed in this position, but failed to find the best continuation.
Ask the Right Questions
We can often find the right continuation through our understanding of classical principles. Unless the center is closed, it’s often the first place we should look when searching for the right plan. With this in mind, it doesn’t take too much thought to find the best move.
18…Qa4
White’s valuable king pawn cannot be defended.
19.0–0 Qxe4 and Black is at least equal. Here’s the compensation:
- Dynamic piece play.
- The bishop pair.
- Open lines.
- Massive square control in the center.
- A 4-2 kingside majority.
Question
What would have made 18...Qa4 easy to find?
Answer
Beginning with the right question! If one side has sacrificed material, he must continue to press his initiative, so the key question was: What’s the most important weakness in my opponent’s position?
19.exf5 Bf7 20.Qe2
Better was 20.Bb6 Rd7 21.Qe3 with a solid advantage for White.
20...e4 21.Nf4 Bf6
The move 21…Qa4 wins the f pawn, and this keeps him in the game. Here’s the variation my computer gives.
21...Qa5+ 22.Kf2 Qxf5 23.g4 Qe5 =Rd1 Rxd1+
Better was 22...Qa5+ 23.Kf2 Nd4 24.Qg4 =
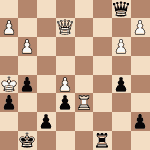
Qxd1 Qxa3 24.Kf2 Ne5 25.Nd5 Bh4+
Better was 25...Nd3+ 26.cxd3 Qxa2+ 27.Qd2 Qxd5 28.dxe4 Qxe4 29.Rd1 Qxf5+ 30.Kg1 with a slight advantage for White.
26.g3 Qxa2 27.Nb4
Even better was 27.Nc3.
27...Qb2 28.gxh4 Qxb4 29.Qd8+ Qf8 30.Qxf8+ Kxf8 31.Bc5+ Ke8 32.Ke3Ng4+ 33.Kxe4 Nf6+ 34.Kd4 Kd7 35.Re1 resigns.
The Right Attitude towards Complications
The messy complications in this game led to a lot of mistakes. I used to fear these kinds of positions because errors I’ve made have cost me games in the past.
However, my mindset has changed about these kinds of positions. The main thing is, I no longer fear them and even more important you learn an incredible amount from every double-edged contest like this.
When you return home, tear the game to pieces in your home laboratory. Whether you won or lost, your imperfections are always refined in the fire.
Download the PGN for this game
Good