Key Points
- Mastering the Tension in Pawn Levers
- Pawn Levers in Your Opening Repertoire
- How to Dislodge Knights from c5 and f5
- Restrain a Key Pawn Advance
- Sector Analysis
- Control of a Color Complex
- Clear, Logical, and Consistent Play
- The Transformation Point
- A Blueprint for Planning
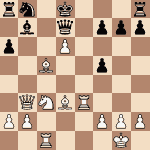
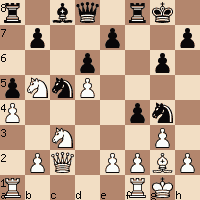
1.d4 f5 2.Nf3 Nf6 3.g3 g6 4.Bg2 Bg7 5.0–0 0–0 6.c4 d6 7.Nc3 Qe8 8.Qb3 c6 9.d5
Mastering the Tension in Pawn Levers
In Pawn Structure Chess, the tension between two pawns is called a “lever.” Very few things dictate the nature of a contest more than how the player handles this tension. Sometimes there is one clear choice; but in many cases, it is a matter of style and preference.There are three ways to handle the c6-d5 lever in this position. Two approaches resolve the tension, and one maintains it:
- Resolve the tension by exchanging pawns.
- Resolve the tension by advancing to
c5. - Maintain the tension, and continue developing.
All three moves have been played by masters in the past.
The move 9...Na6 is played most frequently at high levels, which means it’s most consistent with the spirit of the opening. However, during the game, I was not updated with this theory, and I reasoned through the position as follows:
Option 1: Maintain the Tension
Tradeoff Analysis. If I maintain the tension, White will have the option to capture anytime he wants on c6, and the h1-a8 diagonal will always ensure for his light square Bishop will be an active and powerful piece.
Since maintaining the tension is Black’s most popular choice at the highest levels, this clearly means that he has sufficient offsetting imbalances if he allows this activity.
White’s d pawn currently paralyzes Black’s center, and if White captures on c6, Black will gain a great deal of freedom in the center.
A quick glance reveals that he will be able to freely advance his e pawn after dxc6 However… then Black’s queen pawn will end up backward, and White can apply pressure on the half open queen file.
You have to give squares to get squares.
-Bobby Fischer
This is a classic example of tradeoff analysis at a high level, and the ability to make the right decisions is a key building block in the Making of a Master.
Option 2: Resolve the tension by advancing to c5.
If I advance my c pawn, it will lock up the Queen side. The play will be pushed further out to the flank, and I’ll need to continue with Na6-c7, then Rb8, and create a new lever with b5, to open the b file for my rook.
While that’s happening …
White will play Re1 followed by e4. That’s a standard maneuver in this opening and typically leads to a long-term advantage for White. After Black captures on e4, White will have pressure down the half open e-file.
At first glance, it appears that Black has compensating pressure on the half open f file. However, White will be able to play f4, which transforms his backward f pawn into a strong asset that controls key central squares.
Option 3: Resolve the tension with cxd5.
In this game, I decided to resolve the tension immediately. The main reason was to limit the activity of White’s light square bishop for the rest of the contest.
Definition: Bad Bishop
A bishop stationed on the same color of its own central pawns, whose influence is limited by those pawns.
All this evaluation takes a great deal of time, and I spent about 20 minutes on this move. This is more time than we should be spending on these difficult considerations… especially when it turns out there’s no clear answer. So here’s a guideline for your future play…If you’re not certain how to handle the tension… spend somewhere around five to seven minutes evaluating your options… then just go for the position you like best.
Pawn Levers in Your Opening Repertoire
One of the goals in your opening study is to understand the most common pawn levers in your repertoire. Get a good feeling for your options, and the most popular way they are handled at high levels.
Back to the game.
I encourage you to check out these three scenarios on a live board. You don’t have to spend a lot of time. Just set up the board and play through a couple moves.
Understanding the logic in each scenario will take you a long way towards mastering the tension in every pawn lever. It would be hard to exaggerate the value of this concept. It is a key building block in The Making of a Master.
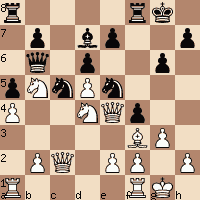
9…cxd5 10.cxd5 Na6 11. Be3
White temporarily controls c5, but only for a single move. It’s instructive to see how the knights work together to control key squares.
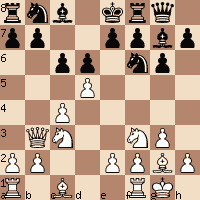
11…Ng4 12.Bd4 Bxd4 13.Nxd4 Nc5 14.Qc2 a5
How to Dislodge Knights from c5 and f5
The knight has a great outpost on c5. Black’s rook pawn prevents b4, and if White plays a3, then Black will respond with a4. This locks up the light squares, and White will never be able to dislodge the knight with a pawn.
Once again speaking from the perspective of Pawn Structure Chess, this is a very important position, so let’s take a quick look.
White doesn’t want his queen side to end up frozen and static, and this means he needs to proceed slowly. He will first play b3, then a3, and finally b4. This prevents Black from locking up the light squares, securing the post for his knight.
However, it’s a very slow plan, and Black can improve his position in the meantime, typically with king side expansion, beginning with h6 and g5.
This exact same logic applies to a Black knight posted on f5.
We can find classic examples of this scenario in both the Advance Caro Khan, and a form of the Modern Defense known as the Gurgenidze. We’ll look at those positions in the future.
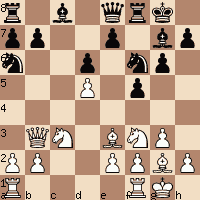
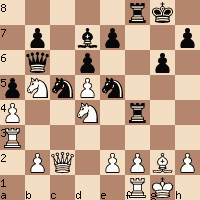
15.Ndb5 Qd8 16.a4? f4
By far the most important move of the game.
Restrain a Key Pawn Advance
White’s last move was a huge positional error. He should have played e3, which would have prevented the f pawn from advancing without further support. In the vocabulary of a positional chess player, prevention of the opponent’s active possibilities is called “prophylaxis,” and it’s another key building block in the Making of a Master.
The move 16...f4 has a huge impact on the outcome of the contest for two different reasons:
- It’s true the knight on
g4looks attractive. However, White can playh3and force it to move at any time. That means it’s important to plan a future home for our friend. Of course, the knight can always retreat tof6, bute5is a much more valuable square. - By direct occupation of
f4, Black prevents White from ever advancing his own f pawn, dislodging the knight from its great post in the center of the board.
Sector Analysis
Although Black has established a great post on the queen side for his other knight, White has even greater square control on that side of the board. This means that Black cannot expect to win on the Queen side.
White’s d5 pawn paralyzes the Black center, so that means the best prospects lie on the king side. The move f4 ensures a space advantage on that side of the board, and creates a new lever to build upon.
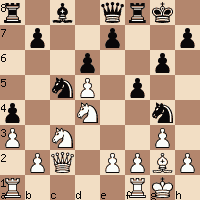
17.Nd4 Qb6 18.Ncb5 Bd7 19.Bf3 Ne5
20.Ra3 Rf7 21.Bg2 Raf8
It’s instructive to compare the activity difference between White’s passive light square bishop and Black’s centralized knight on e5. This is a reminder of how the central tension was resolved early in the game with 9…cxd5. It’s easy to see that decision turned out well. It hadn’t occurred to me over the board… but playing over this contest… I am struck by the aimlessness of White’s play. This is especially highlighted by the maneuvers Bg2-f3-g2, and Nd4-b5-d4. That adds up to a lot of shuffling around, and four lost tempi. In the meantime, Black has steadily improved his position.
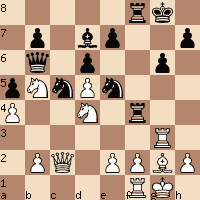
22.gxf4?
White could not see a way to make progress, so he changes the pawn structure because he wants to bring his queen rook over to the King side.
It’s true there was no way for him to make progress, because his play has not been coherent, and so he doesn’t have any good moves right now.
However…
The move 22.gxf4 was a faulty idea with severe consequences. White should have played a waiting move like 22.Rc3, and waited to see how Black would attempt to realize his advantage.
22…Rxf4
Control of a Color Complex
All of Black’s pieces have naturally gravitated to dark squares. This makes sense, because the dark square bishops were exchanged several moves ago. Black has consistently increased his control of the dark squares ever since move 10 with all the following maneuvers.
- Na6-c5
- Qe8-d8-b6
- f4
- Nf3-g5-e5
- Rf8-f7-f4
- Rc8-f8
Clear, Logical, and Consistent Play
You don’t have to be brilliant to win a lot of games. If your play is logical and consistent, you will score many fine victories against strong players, as you continue to improve.
Spend a lot of your best time on the clock looking for a coherent plan based upon control of a key square or entire complex of squares. This is a key building block in The Making of a Master.
23.3Rg
The Transformation Point
We use language to create meaning, and once we have a name for something, it becomes part of our inner dialogue. This enables us to work directly with a concept, increase our understanding, and find applications to real life.
In terms of chess, our working vocabulary of key concepts helps guide our analysis as we search of the best move (“king side attack, “backward pawn,” “post for knight”, etc.). It would be very difficult to break down a position without these concepts. They are the building blocks of our analysis.
The Transformation Point is a term I created to describe the endpoint of a long- term build up. It means that all the pieces have found their best squares, and we have achieved the objectives of a plan formed earlier in the contest.
This means that the Transformation Point represents the end of one phase, and the beginning of another.
It’s a key moment in time, and usually deserves a great deal more planning and calculation than most other moves for two important reasons:
- Since all the pieces are optimized, a tactical sequence often lies close at hand.
- If tactical opportunities do not present themselves, we need to establish our next objective. This takes time and thought.
A Blueprint for Planning
As always, when looking for a plan, begin with a general evaluation of the big picture imbalances. Assess any vulnerabilities in your own position. Then focus on your opponent’s weaknesses, and look for a way to exploit them.
Back to 23.Rg3…
White should have abandoned this idea, because the only move to keep him in the game was e3. Black is clearly better after 23...Rh4, but still not definitely winning.
Now we will see the devastating consequences of White’s faulty idea. This specific Transformation Point yields an immediate tactical harvest, so let’s look at the geometry involved before playing through the moves.
24...Nxa4 Nxa4 25.e3 Rc4 26.Nc3 Qxb2 27.Qxb2 Nxb2 28.Nb5a4 29.f4 Ned3 30.f5 Kg7 31.Nd4 Nc5 32.Ne6+ Nxe6 33.dxe6 Rc5 34.e4 b5 35.Rb1 Rc2 36.e5 dxe5 37.Be4 Re2 38.Bf3 Rd2
39.fxg6 hxg6 40.Be4 Rf6 41.Kh1 b4 42.Rbg1 Rd1
Trading off one of the attackers. Capturing on g6 would now lose a piece.
43.Rxd1 Nxd1 44.Bc2 Nc3
The knights have performed magically throughout the entire game. They’ve always had great squares, and a perfect response to every threat.
45.Kg2 e4 46.h4 Kh6 47.Bxa4 Nxa4 48.Rb3 Nc5 49.Rxb4 Rxe650.Kf1 Kh5 51.Ke2 Kxh4 52.Ke3 Rd6 53.Rb5 Rd5 54.Rb1 e5
55.Rc1 g5 56.Rh1+ Kg4 57.Rg1+ Kf5 58.Rf1+ Kg6 59.Rf8 Rd3+
60.Ke2 Rf3 61.Rc8 Ne6 62.Rc6 Kf5 63.Rc8 Nd4+ 64.Kd2 e3+
Ke1 e2 resigns.