In different variations of the French Defense, White often plays Qg4 to attack g7.
Black has two ways to respond to this threat.
First of all, he can play …g6, which weakens the dark squares around his king. His other option is to play …Kf8, which leaves his King rook out of play for a good while. That’s what happened in this game, and it led to a very interesting contest.
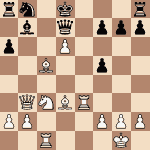
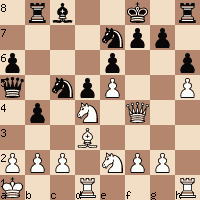
1.e4 e6 2.d4 d5 3.Nc3 Nf6 4.Bg5 Be7 5.e5 Nfd7 6.h4 a6 7.Qg4 Kf8
It may look like Black has done something wrong, but this variation has been played at high levels. As compensation for his inactive rook, Black works on breaking down White’s center, and attacks on the other wing.
However …
Long Term Problems in Chess
Even though this line has been played many times at high levels, it’s less popular than other variations, and I wouldn’t want to play this way for two reasons:
- First of all, it’s an extremely committal way to play the opening, because Black’s king rook will be out of play for a good while. That means he has a long-term problem that might not be easy to solve. Why play an opening that automatically burdens you with a serious problem, when there are plenty of other chess openings to choose from?
- Black might not find his compensation if he doesn’t play accurately. In that case there’s a good chance he would end up with a very difficult game. That’s exactly what happened in this contest.
8.Nf3
When playing against the French Defense, sometimes f4 is played before Nf3, and sometimes Nf3 is played directly. In some variations, it’s a matter of preference, and at other times the position dictates a specific course of action.
In this particular position, White always plays Nf3 directly. As a general guideline, the more dynamic and unbalanced the position, the more likely it is that White will play Nf3, and focus on piece play.
Dynamic Piece Play vs Positional Maneuvering
This is a good time to outline the two general styles of chess play. Most masters lean towards either one, and they all play both ways, depending upon the position.
Personally, about twenty years ago, when I first achieved the Expert ranking, my style leaned more towards slower positional play filled with interesting maneuvers. Since then it has evolved in the direction of active piece play. Neither style is better. It’s just a matter of what you like best.
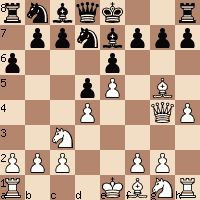
8…c5 9.dxc5 Nc6 10.Qg3
In the French Defense, if White doesn’t play c3 to fortify the d4 square, then Black often pressures White’s e pawn, after the d pawn gets exchanged.
I knew I had to defend my e pawn with a queen move, but was uncertain whether Qf4 or Qg3 was better, and I’ve seen both moves played before.
In this case it turns out that Qf4 was the better move. This makes sense, since Black’s g7 square is defended, and later in the game, there’s a good chance I can create pressure against f7.
10…Nxc5
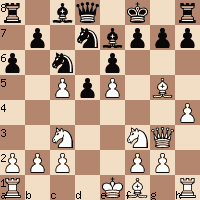
Since the e5 pawn is weak, it would be thematic for Black to play 10…Qc7 to increase the pressure on this vital pawn, which is the heart of White’s game. However, I would force the knight off the e pawn with 11.Bxe7+ Nxe7 followed by 12.000. Then I can protect the e pawn a third time with 13.Re1, if Black’s knight returns to c6.
Highest and Best Use
That means it makes more sense for Black to develop his queen to a square that will help him develop a counterattack against my king.
Throughout the game, we have to choose between two different paths for the use of our pieces. Usually concrete board analysis is necessary to make the best choice. Sometimes, you can simply count the number of pieces attacking and defending a certain piece or square, and that will give you the answer, as it does in this case. When you do a simple piece count, just make sure each piece doesn’t have other key responsibilities, and it truly defends the square.
11.0–0–0 b5 12.Bd3
This move completes my development. In addition, it would be a mistake to allow 12…b4 followed by 13…Ne4.
12…Qa5 13.Bxe7+ Nxe7 14.Kb1
Defending a2 against the …b4 advance.
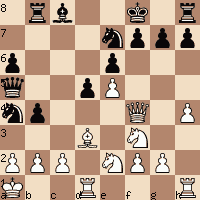
14…Rb8
An interesting choice. The move Rb8 is also played in several variations of the Sicilian Defense after White castles queenside. Black is looking for a focal point of attack. The squares a2 and c2 will always be sufficiently defended, so he hopes to open the b file, and break through on b2.
15.Qf4
Threatening Ng5, with a double attack against h7 and f7.
15...b4
15…Na4 is the most thematic move. However, White’s kingside play is stronger, as the following variation easily makes clear.16.Ng5 Nxc3+ 17.bxc3 Nf5 18.Bxf5 exf5 19.e6 hits the rook with the queen, and also threatens mate, beginning with Qd6 check. 19…Rb7 20.Qd6+ Re7 21.exf7 with Rxd5 to follow.
16.Ne2 Na4
Threatening a devastating check on c3.
17.Ka1
This is a simple move, but it’s the kind of idea that probably wouldn’t have occurred to me early in my chess career. Certain moves suggest themselves easily, and others require a little more experience to find.
In general, most players find attacking moves more easily than key defensive ideas. It just seems to be the nature of chess.
Since b2 is the point of attack, it’s easy to clear b1 so my rook can move to that square. Black’s b file play is then meaningless, since his king rook is a long way from entering the game.
Is the Best Move Always Best?
In a few moments I’ll show another line that was also playable. Technically it leads to a larger advantage. However, it’s very messy, and the game continuation was much simpler and easier to analyze.
This leads us to an interesting conclusion: Whether or not I care about playing the best move depends upon the position. If I had this game to play over again, I would definitely play 13.Qf4, instead of 13.Qg3. That’s because it was clearly the best move, and there was no complicated analysis to work through, in order to verify it achieved the goal.
On the other hand I still like 17.Ka1, even though it wasn’t technically as strong, because it saved time on the clock, and the position remained very thematic, and I felt like I had a high level of understanding of the position, and knew exactly how I wanted to continue.
17.Ng5 Nf5 18.Bxf5 Nc3+ 19.bxc3 bxc3+ 20.Ka1 Rb2 21.Nxc3 Qxc3 22.Rh3
17…h6 18.Nfd4
A thematic centralizing move that prevents Black’s king knight from using c6 This is especially significant since my light square bishop controls f5 and g6.
18…Nc5 19.h5
19...b3 20.cxb3 Nxb3+ 21.Nxb3 Rxb3
I’d like to play Rc1, but his rook can capture my bishop.
22.Bg6
Now we see the key point behind h5, which set up this double purpose move which combines attack and defense.
Now my bishop escapes from his rook and threatens mate at the same time. This wins a valuable tempo, and I’ll use it to finish the game. My opponent will never be allowed to get his king rook in the game, and gets overwhelmed as a result.
22…Nxg6 23.hxg6
A new mate threat. Black is forced to use another tempo to defend b7.
23…Rb7
Forced. Now my knight and rooks will rapidly centralize and finish the contest.
24.Rc1 Qd8
The only move.
25.Rc3 Re7 26.Nd4 Bd7 27.Rhc1 Ke8 28.Nc6 Bxc6 29.Rxc6
Resigns.