This Article
In this contest, you’ll see a real world example of how to build a long-term sustainable post for your knight. Once you have read the two companion articles, you will have a Master Level Understanding of “how to get the most out of your knights.”
The Master Series
Mastery is within the grasp of any man
Each article in The Master Series will help you gain a deep understanding of a Key Building Block. It takes the average master a great deal of study and practical play to gather this knowledge. Over time you will receive all the Key Building Blocks you need to master this game yourself.
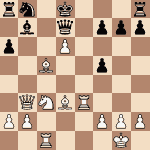
1.e4 c5 2.d4 cxd4 3.c3
This is the Smith Morra Gambit … a very tricky opening.
3...dxc3 4.Nxc3 Nc6 5.Nf3 d6 6.Bc4 a6 7.0–0
Nf6 8.Bg5 e6 9.Qe2 h6 10.Be3 b5 11.Bd3 Ng4
12.Bd2 Bb7 13.h3 Nge5
Black’s knights often visit this square, and many important variations are based on this maneuver. However, it’s not a true post, because the knight can always be forced to move when White plays f4. More often than not, it’s on the way to c4.
However, e5 does become a true post in some variations.
White sometimes advances his f pawn to the fifth rank, and then e5 becomes a long-term post for the knight. That’s because it can no longer be forced to move by a pawn.
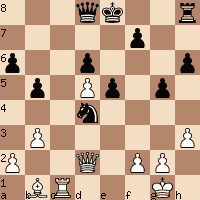
14.Rac1 Rc8 15.Bb1 Be7 16.b3 Nxf3+ 17.Qxf3 Bg5
The exchange of dark square bishops helps my game in two ways:
- It trades off my least active minor piece.
- I begin building a post for the knight. In this case, the “post building activity” involves eliminating White’s dark square bishop, which could have been used to capture my knight, which is heading for d4.
18.Rfd1 Nd4 19.Qd3 Bxd2 20.Qxd2 e5 21.Nd5
A huge positional mistake. White should have played 21. Ne2, opposing the knight on d4.
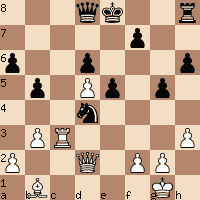
Neutralize Your Opponent’s Best Pieces
If your opponent is better, look to see if you can force a trade of his best piece, or make it move to an inferior square.
The outcome of many games is determined by the comparative strength of opposing minor pieces. In this contest, Black’s knight on d4 will completely dominate White’s light square bishop.
21...Rxc1 22.Rxc1 Bxd5 23.exd5 g5
This is my second “post building move” and now d4 is secured for life.
One key factor that determines the strength of a knight post is the stability of the pawn that anchors the knight. In this case, the knight is secured by the pawn on e5. The move 23…g5 ensures that vital pawn can’t be undermined by f4.
There’s another reason to stop f4. My king rook isn’t in play yet, and I’m not ready for the position to open up, especially around the kingside. If White plays f4, it will open lines and create new problems I’m not yet ready to solve.
Before moving on, let’s summarize all the important “post-building activities.”
Post Building Activities
- Eliminate pawns on adjacent files.
- Eliminate pieces that opponent could trade for knight.
- Support square with pawn.
- Ensure pawn can’t be destroyed.
24.Rc3
Question
Which square do you think is most important right now?
Answer
At this exact moment … c6 is by far the most important square. White controls the c file, and that’s his number one asset. Here’s how to weigh the value of a file:
How to Weigh the Value of a File
- Assess targets with goal to capture.
- Assess weak squares with goal to occupy.
In this case, there are no targets on the file, and the only weak square is c6.
Black has two weak pawns lying low on the third rank. White would love to play Rc6 right now, in order to pressure them.
This would be a great way to turn his control of the c file into something useful because it would force Black to play defensively.
In summary, if White could play Rc6 right now, his prospects would improve dramatically.
This is especially true since Black’s king rook is not in the game. However, the Our Valiant Hero controls c6, and this gives Black time to bring his rook into play.
Question
What’s the best way for Black to get his king rook in the game?
Answer
The move 24…Kd7 prepares …Qa8, which is a powerful idea for two reasons:
- It prepares …Rc8, which will neutralize the c file, and achieve the important goal of trading Black’s inactive rook for its active counterpart.
- White’s d pawn comes under attack from a8.
Question
The knight plays a key role in this variation. What is it?
Answer
White would like to play Qc1 right now. That would convert his control of the c file into something useful. He would then prevent …Qa8, because it would end up losing after Rc7+.
However, White is unable to play Qc1, because it would lose immediately after …Ne2 check.
24…Kd7 25.Bd3
White doesn’t have many useful moves right now.
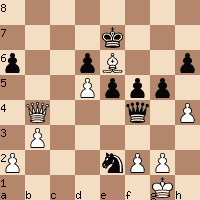
25...Qa8 26.Be4 f5 27.Bf3 Rc8 28.Rxc8 Qxc8 29.Bh5 Qb7 30.Bf7 Ke7 31.Bg8 Qb8 32.Be6 b4
Prepare Squares for Occupation
Queen endings can be very difficult. In the one that is coming up, I have to be concerned about what will happen if White’s queen penetrates either side of the board. It’s especially important to watch out for perpetual checks, because my king doesn’t have good pawn cover.
White’s queen will also probably win material when it penetrates because I have weak pawns on both sides of the board.
The move b4 is designed for multiple purposes. It will help Black’s queen penetrate White’s position on the c3 square, which will create many new opportunities. Of equal importance, this new active post will completely eliminate threats to my queenside.
Eventually …
After the bishop and knight are exchanged … my queen and king will cooperate on White’s kingside. Together they can play four different roles, depending on the direction of the game.
Queen Endings: Roles for King and Queen
- Prevent perpetual check.
- Threaten checkmate.
- Threaten queen trade into won king-pawn ending.
- Advance pawns down the board.
- Queen a pawn.
33.h4 Qc7
One of the best moves of the game. It is designed against threats to both sides of the board.
34.hxg5
If White had captured on b4, the knight would have finished the game beautifully as follows: 34.Qxb4 Qc1+ 35.Kh2 Qf4+ 36.Kg1 Ne2+ winning the queen.
34...Qc3 35.Qd1 Nxe6 36.dxe6 hxg5 37.Qh5 Kxe6
In many ways this is a typical queen ending. Here’s how they often unfold:
The 3 Phase Cycle of Queen Endings
- The inferior side plays long checking sequences.
- They finally run out of checks.
- The stronger side gets a move to improve his position.
After that the cycle repeats itself … often multiple times … until the advantage becomes overwhelming, and the opponent is forced to resign.
38.Qxg5 Qe1+ 39.Kh2 Qxf2 40.Qg8+ Kd7 41.Qf7+ Kc6 42.Qc4+ Qc5 43.Qxa6+ Kd5 44.Qd3+ Qd4 45.Qb5+ Ke4 46.Qe2+ Kf4 47.g3+ Kg5 48.Qc2 e4 49.Qc1+ e3 50.Kh3 Qg4+ 51.Kh2 Qe2+ 52.Kh3 f4
Opening lines around White’s king makes it much harder for him to avoid a queen trade. Black’s king is now doing extremely well. It is sheltered from perpetual check … and controls important squares around White’s king.
53.gxf4+ Kxf4
Note how Black’s queen covers all the checking squares.
54.Qc7 Qh5+ 55.Kg2 Qd5+ 56.Kg1 e2 57.Qe7 Qd1+ 58.Kh2 e1Q 59.Qf6+ Ke3 60.Qe7+ Kd2 61.Qxd6+ Kc1 62.Qc7+ Kb1 63.Qh7+ Ka1 64.Qg7+ Qc3 resigns.