Key Points
- Winning and Improving
- When to Capture the Knight on
c6 - Proof You Can Beat a Master
- Choose Initiative over Material
- The Relative Value of Weak Squares
- All-out Struggle for a Key Square
- How Important is it to Find the Best Move?
- How do you Define the Best Move?
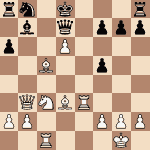
1.e4 c5 2.Nf3 d6 3.d4 cxd4 4.Nxd4 Nf6 5.Nc3 a6 6.Be3 e6 7.Be2 Be7 8.Qd2 b5 9.a3 Bb7 10.f3 Nc6
Winning and Improving
There’s a lot to learn about the Open Sicilian, and for a long time, I avoided this theory by playing the Grand Prix Attack against the Sicilian Defense.
However, a couple years back, I decided to embrace the theory, because the open Sicilian is the most promising way to play for a win against 1...c5.
These games also lead to many of the most exciting and interesting positions in all of chess. That’s a big part of why it’s the most commonly played opening at the highest levels.
We all take on a mindset of not wanting to lose as we improve and score solid tournament results. That’s natural in any form of competition.
As part of your big picture plan, I encourage you to think more about improving than winning
It’s good to focus on the reason we became attracted to chess at the very beginning. Thinking back to that moment, it’s easy to remember that our attraction was based upon the endless fascination, mental challenge, and infinite variety of the Game of Kings.
It’s best to think about winning as the result of your ongoing improvement and competitive mindset. For that reason, as part of your big picture plan, I encourage you to think much more about improving than winning. Continue improving, and winning will take care of itself. Learn from each loss and it becomes the seed of a future victory.
Here’s the bottom line:
Over the last two years I’ve spent some time learning ideas in the Open Sicilian. I’m not at all into memorizing variations, and spend very little time that way. I want my study to be fun and interesting, and have developed an entire system to support that goal.
That means one of my primary goals in my opening study was to develop a set of guidelines I could apply across a wide range of positions, so now let’s look specifically at the Sicilian knight on c6.
When to Capture the Knight on c6
In many Sicilian positions, this knight becomes Black’s strongest piece. It often moves to e5, then c4, and creates a great deal of Black activity.
Capturing on c6 is often bad with Black’s knight pawn still on b7. That’s because when he recaptures with the pawn it opens the b file, strengthens the center, and supports d5.
These positions are playable for White, but it is a very antipositional treatment, and almost all strong masters prefer other strategies.
If Black’s knight is still on c6 when he plays b5, that’s the perfect time to make the capture. This exchange makes White’s game easier to play, and eliminates many of Black’s active possibilities
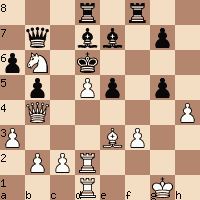
11.Nxc6 Bxc6 12.g4 Nd7 13.g5 Qc7 14.0–0
White can castle to either side, and I usually prefer queen side. However, it’s riskier after playing a3. That’s because Black will play b4 soon, and this will open up lines to my king. In this specific position, it’s clear that Black’s attack will come much faster.
14...Nb6 15.Qd4 Nc4
Proof You Can Beat a Master
Masters don’t go down easy, but they always make mistakes
Masters don’t go down easy, but they always make mistakes. That’s why they’re rated 2200 instead of 2600. Sometimes their oversights are extreme, and in this case my opponent allows a simple double attack.
Bxc4
This capture was much better than 16.Qxg7 Nxe3 17.Qxh8+ Kd7 18.Qxh7 Nxf1 19.Rxf1 Bxg5 20.Qxf7+ Be7.
Here’s the endpoint of that variation:

Choose Initiative over Material
Compared to the game, White wins an additional pawn in this variation. However, let’s assess the risk:
- There are many weak squares around the King.
- The dark squares are weak. Black has a dark square Bishop, and White’s has already exchanged his dark square bishop.
- Both the knight and rook files can be used to attack White’s king.
For all these reasons, White’s advantage is larger and contains less risk after the simple capture on c4.
The computer also likes it more. On the other hand, even if the computer evaluation was not greater, White maintains the initiative in the game, which makes it much easier and more fun to play.
16...e5 17.Bxf7+ Kxf7 18.Qd3 Rhf8 19.Nd5 Qb7
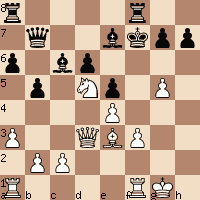
White will open the b3-g8 diagonal, and create new problems for Black, who will soon be faced with some very difficult decisions.
20.Nb6 Rad8 21.Qb3+ d5
After 21...Ke8 Black’s rooks can no longer work together, and Black’s king will remain in the center for the rest of the game. White will simply build on the position, and the win should be easy.
Rad1 Ke6
Although he would still be technically lost, Black could have sheltered his king and connected his rooks with this sharp variation.
22...Bxg5 23.f4 Bxf4 24.exd5 Bd7 25.Nxd7 Qxd7 26.Bxf4 exf4 27.Rxf4+ Kg8.
White has much more work ahead of him, compared to the game.
23.h4
This was a good move which defends the weak g pawn, and eliminates the possibility of Bxg5. Even better was 24.exd5+ Rxd5
25.c4 The key point. 25...Rxd1 26.Rxd1.
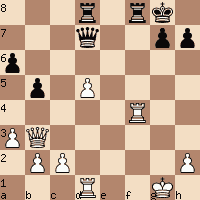
23…h6 24.Rf2 hg 25.Rd2
There are two important teaching points connected with this move:
- The relative value of weak squares.
- The all-out struggle to control a square. What happens when it falls.
The Relative Value of Weak Squares
I was almost certain we would end up with this position after 23.h4. The only downside of the entire sequence was the fact that I ended up with a weak pawn on f3, and Black’s rook bearing directly down upon it.
This occurred naturally after Black played …fxg5 and White played Rfd2. That means it was necessary to calculate the implications of this new weakness. In many positions, it would be important, and possibly even losing, depending upon what’s happening on the rest of the board.
All-out Struggle for a Key Square
In this position, we have reached the climax of an all-out struggle for d5. White has concentrated overwhelming force upon this square, and Black cannot defend it with enough pieces. Of course, this was the point of Rf1-f2-d2.
It was exactly this maneuver that abandoned the f pawn.
However, the queen pawn is infinitely more important in this position. When it falls, Black’s King will need to run like a rabbit, and in the meantime, he’ll suffer the loss of additional material.
Here’s another key insight …
Let’s forget about this specific position for a moment, and think in more general terms. Here’s what happens when two sides engage in an all-out struggle for a key square. If the square falls, in a very high percentage of cases, the second player’s position immediately falls apart.
Why is that?
It’s because he has dedicated his resources to holding the square, instead of seeking play elsewhere on the board. This means he probably won’t have any real counterplay, and this also means the attacking side won’t have to surrender the initiative when he conquers the key point.
It’s the exact opposite…
The attacker’s momentum is likely to increase. That’s because the square was highly contested for a reason, and when it falls into the abyss, new squares and material often follow behind it.
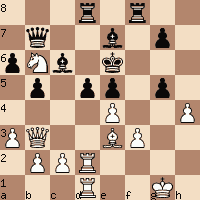
25...Kd6 26.Nxd5
I spent about five minutes on this position, because I sensed a knockout was near at hand. Unfortunately, after giving the position substantial thought, I still missed a devastating continuation.
26.exd5 Bd7 27.Qb4
How Important is it to Find the Best Move?
It depends.
Sometimes only a single move wins or saves the game. Finding the best move is essential in those cases. This also has implications on time management. You need to be willing to invest some real time into finding the best move in critical positions. Here are scenarios when finding the best move is less important:
- The position is so complicated that the amount of time it takes to find the best move isn’t worth the time you’ll spend on the clock.
- An advantage can be so large that playing a 2nd or even 3rd best move doesn’t diminish the winning chances of all.
- A 2nd best move leads to a position that is easier to play.
This leads us to a new question, which is even more interesting and important than the last …
How Should We Define the Best Move?
If you’re already winning, the best move is the one that allows the least amount of counterplay
There are two ways to answer that question. The first is measured in terms of efficiency and mathematics. The second answer is more pragmatic. Read carefully because this information is worth rating points.
The Analytical Approach. I used to believe I could find absolute truth on the chessboard, which meant there was always a chance I could “play a perfect game.” From that perspective, I would have described the best move as one that led to the greatest advantage (as quantified by my chess computer), or ended the game in the fewest number of moves.
The Pragmatic Approach. I suffered under this unfortunate illusion for at least a decade, and it cost me a lot of worry and time on the clock. However, a much deeper study of the game, my own limitations, and the best approach to live competition yields a far different answer.
After a great deal of thought, and plenty of experience, I’m convinced the best move will meet any or all the following conditions:
- It retains the win, while making the game easier to play. It’s completely irrelevant if the game takes 15 moves longer. That’s especially the case when the pragmatic move requires less calculation and mental energy.
- The computer would measure efficiency in terms of the shortest distance from point A to point B. The pragmatic view defines the most efficient path as the one that gives you the best mix of these two variables:
- Highest certainty of result.
- Least amount of worry and calculation.
This leads to our final point. If you’re already winning, the best move is the one that allows the least amount of counterplay.
26...Bxd5 27.Rxd5+ Kc7 28.Qc3+ Kb8 29.Qxe5+ Ka8 30.Rxd8+ Bxd8 31.hxg5
Here’s a more artistic variation that led to an even larger advantage:
31.Qf5 Be7 32.Qxf8+ Bxf8 33.Rd8+ Qb8 34.Rxb8+ Kxb8 35.hxg5
31...Bc7 32.Qd5 Rxf3 33.Qxb7+ Kxb7 34.Rd3 Rf7 35.Kg2 Kc6
36.Bd4 Rf4 37.Rc3+ Kd6 38.Rxc7 Rxe4 39.Bb6 Rg4+ 40.Kf3
Rxg5 41.Ra7 Kc6 42.Be3 resigns